Tutorial profissional para reparo, lubrificação, redução de ruído e manutenção de teclados.
Prefácio
Bem-vindo ao guia definitivo para personalização de teclados. Este manual completo abrange todo o ecossistema de acessórios de modificação da PAYSON e itens essenciais. ferramentas para teclas de teclado, Incluindo kits de desmontagem de precisão, estações de lubrificação profissionais, acessórios para ajuste de estabilizadores, materiais de amortecimento acústico e estojos de proteção premium.
Seja você um iniciante querendo lubrificar seus switches pela primeira vez ou um entusiasta experiente em busca do perfil de som "thocky" perfeito, este guia passo a passo irá orientá-lo na manutenção diária, ajuste acústico e proteção do hardware usando os melhores produtos. ferramentas para teclas de teclado Disponível no mercado.
Regras de segurança e operação
Antes de iniciar o processo de modificação, observe rigorosamente as seguintes precauções:
- Desconexão de energia: Sempre desconecte o teclado da tomada e desligue quaisquer interruptores sem fio (Bluetooth/2.4G) antes de começar. Se o seu teclado tiver uma bateria interna, manuseie os cabos internos com extremo cuidado para evitar curto-circuito.
- Manuseio cuidadoso: Não utilize força excessiva durante a desmontagem. As placas de circuito impresso (PCBs) de teclados mecânicos, os soquetes hot-swap e as carcaças de plástico são delicados. Se algo parecer preso, verifique se há parafusos ou travas escondidas.
- Gestão de lubrificantes: Mantenha todos os lubrificantes longe dos componentes eletrônicos e dos pinos de contato metálicos da placa de circuito impresso. Limpe imediatamente qualquer excesso de graxa com um pano de microfibra.
- Uso pretendido: Todos os acessórios PAYSON são projetados com precisão especificamente para teclados mecânicos e não devem ser usados para reparos domésticos de uso intenso.
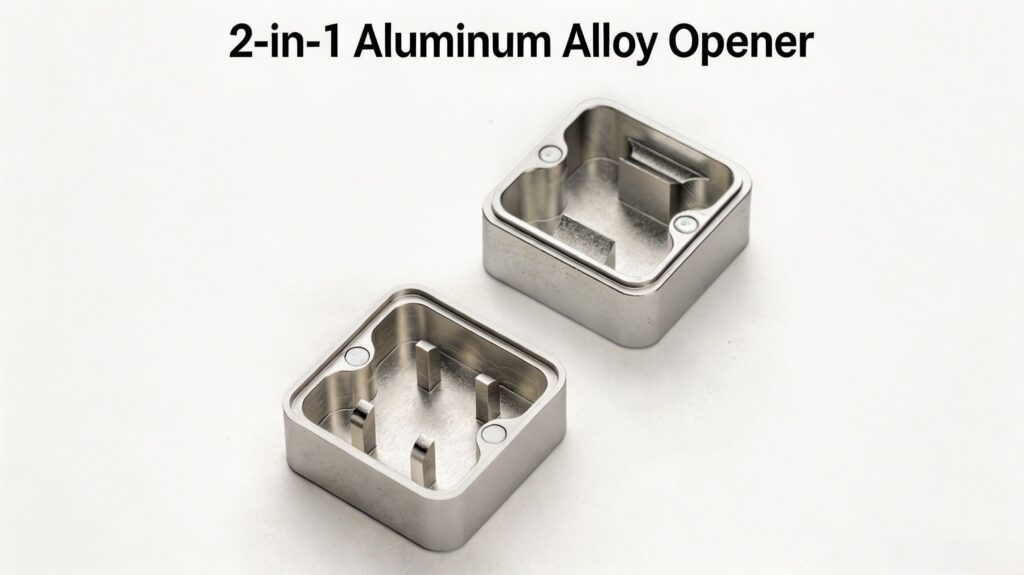
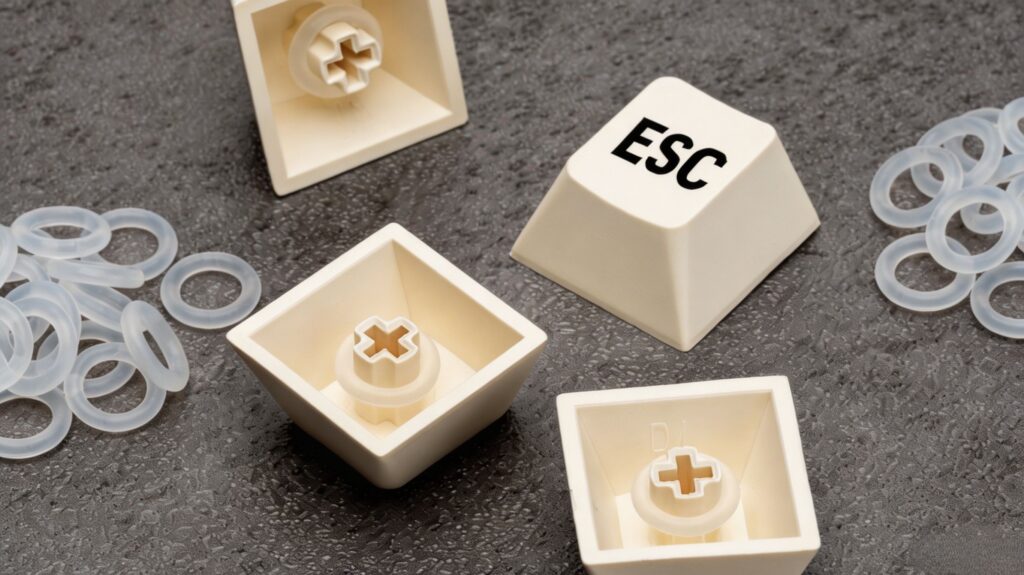
1. Abridor de interruptor 2 em 1 em liga de alumínio PAYSON
Apresentação do produto: Fabricado em liga de alumínio premium usinada por CNC, este produto durável Abridor de interruptor PAYSON 2 em 1 em liga de alumínio é um item indispensável junto com seus outros produtos. ferramentas para teclas de teclado Ideal para qualquer construtor de teclados personalizados. Possui um design de dupla face: um lado para switches padrão de 4 pinos estilo MX (como Cherry, Gateron, JWK) e o outro para switches de 2 pinos estilo Kailh/BOX. Evita os danos e a frustração frequentemente causados pelo uso de chaves de fenda de ponta chata para abrir os switches.
Instruções detalhadas de utilização:
- Identifique o tipo de interruptor (estilo MX ou estilo BOX) e coloque o abridor sobre uma mesa plana e estável.
- Alinhe as abas inferiores do seu interruptor mecânico com os pinos correspondentes no abridor de interruptor.
- Pressione o interruptor firmemente e uniformemente pela parte superior da haste. Você ouvirá um estalo satisfatório quando a parte superior se separar da parte inferior.
- Levante cuidadosamente a tampa superior. Agora você pode separar os quatro componentes principais: a tampa superior, a haste, a mola e a tampa inferior (folha).
- Após a limpeza e lubrificação, alinhe os pés da parte superior da carcaça com os trilhos da parte inferior e pressione-os até que se encaixem firmemente no lugar com um clique.
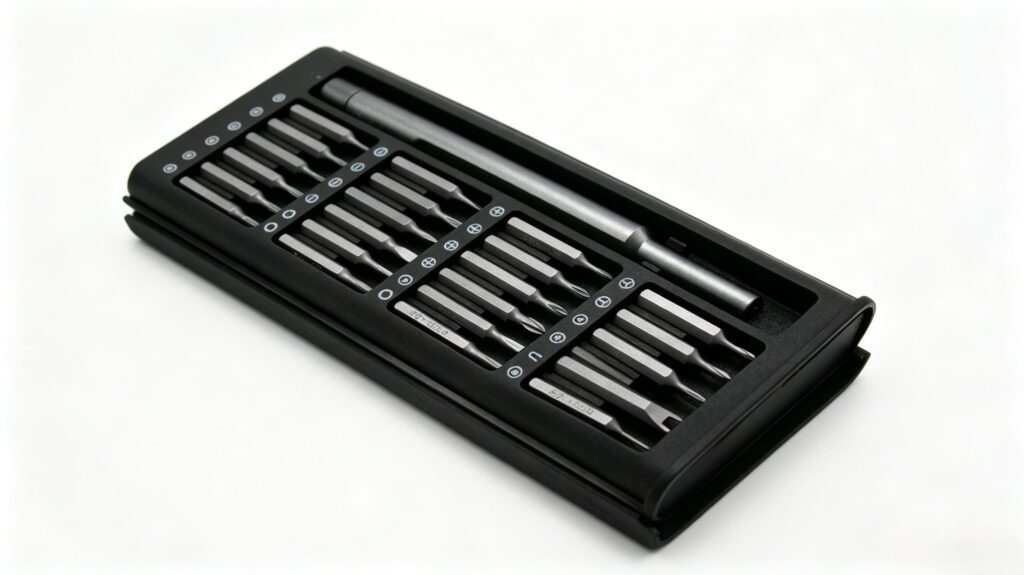
2. Jogo de Chaves de Fenda de Precisão PAYSON 24 em 1
Apresentação do produto: Este produto magnético de alta qualidade Conjunto de chaves de fenda de precisão PAYSON 24 em 1 Inclui 24 pontas de aço S2 usinadas com precisão, abrangendo os tipos Phillips, fenda, Torx, hexagonal e muito mais. Alojada em um elegante estojo de alumínio, a alça magnética antiderrapante garante a aderência e o torque perfeitos para desmontar gabinetes de teclado, placas de circuito impresso e até mesmo laptops sem danificar parafusos delicados.
Instruções detalhadas de utilização:
- Examine a carcaça do seu teclado para identificar os tipos de parafusos (geralmente Phillips ou sextavados). Selecione a chave de fenda correspondente na caixa onde os parafusos estão guardados.
- Insira a ponta na alça magnética; ela se encaixará firmemente no lugar.
- Mantenha a chave de fenda perfeitamente perpendicular (90 graus) à cabeça do parafuso para garantir um encaixe perfeito e evitar danificar a rosca.
- Aplique uma leve pressão para baixo enquanto gira no sentido anti-horário para soltar. Para remontar, gire no sentido horário até sentir resistência natural.não aperte demais, pois isso pode rachar as caixas de plástico ou danificar a placa de circuito impresso.
- Dica profissional: Use uma base magnética ou pequenos recipientes para organizar os parafusos por tamanho e localização, já que as carcaças de teclado geralmente usam parafusos de comprimentos diferentes.
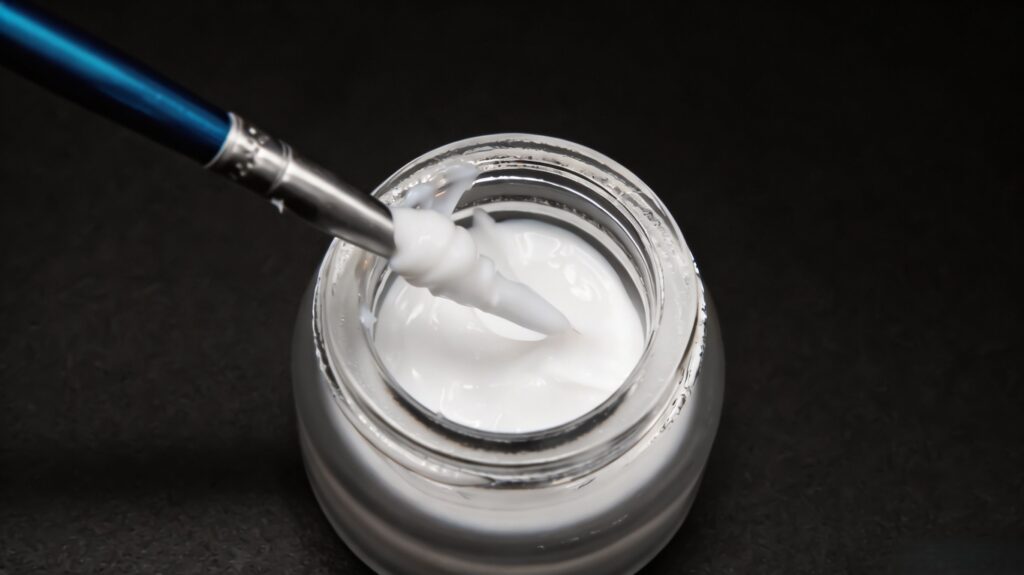
3. Kit de Lubrificação para Teclado PAYSON / Kit de Lubrificação para Switches e Lubrificante
Apresentação do produto: Os interruptores de fábrica costumam apresentar ruídos e estalos da mola. Kit de Lubrificação para Teclado PAYSON e o abrangente Kit de lubrificação para switches de teclado PAYSON Fornecemos tudo o que você precisa: graxa sintética premium, pincéis de ponta fina, suporte para haste e pinças. Combinado com nosso produto especializado. Lubrificante para teclado PAYSON, Essa configuração reduz o atrito entre o plástico e o plástico, resultando em uma digitação extremamente suave e uma assinatura sonora mais profunda e refinada.
Instruções detalhadas de utilização:
- Abra o interruptor usando o abridor de interruptores PAYSON e separe os componentes.
- A Regra de Ouro: Menos é mais. Mergulhe levemente a ponta do pincel no lubrificante. Você precisa apenas de uma camada fina e brilhante, não de uma camada grossa.
- Carcaça inferior: Aplique uma camada fina de produto nas duas laterais onde a haste desliza.
- Primavera: Você pode escovar as extremidades superior e inferior da mola ou lubrificá-las com óleo, agitando-as dentro de um saco plástico com algumas gotas de óleo.
- Tronco: Aplique uma camada fina de lubrificante nos deslizadores laterais e no polo cilíndrico inferior. Evite lubrificar os pinos frontais se estiver lubrificando switches táteis, pois isso pode reduzir a resposta tátil.
- Remonte o interruptor e pressione-o de 10 a 20 vezes para distribuir o lubrificante uniformemente. Limpe qualquer resíduo externo.
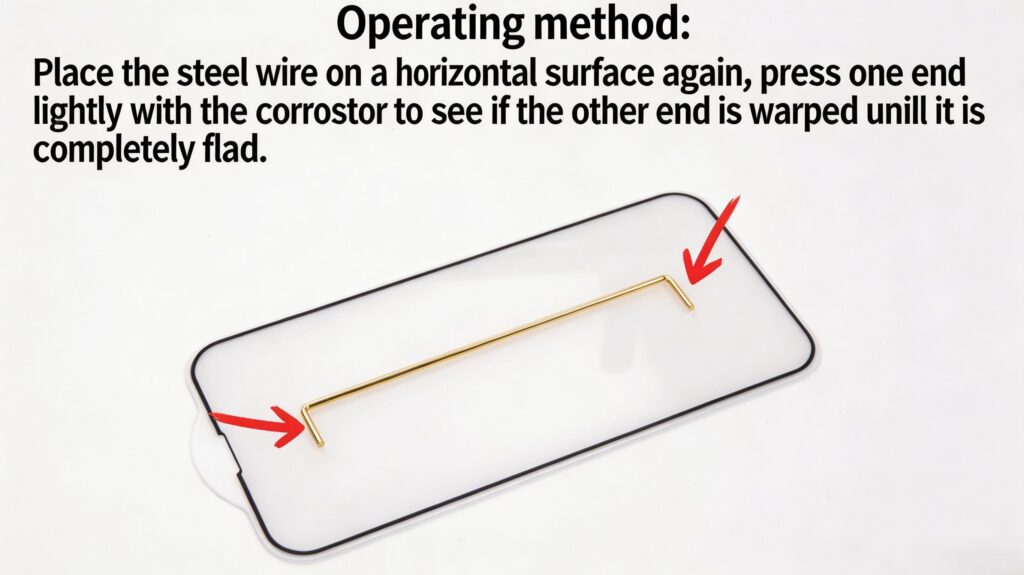
4. Ferramenta de nivelamento de cabos estabilizadores PAYSON
Apresentação do produto: Um estabilizador perfeitamente lubrificado ainda pode vibrar se o fio de metal estiver dobrado — um problema comum que ocorre durante a fabricação ou o transporte. Ferramenta de nivelamento de fio estabilizador PAYSON É usinado com precisão para ajudar você a segurar, torcer e endireitar perfeitamente os fios do estabilizador, eliminando o temido som de "tique-taque" nas teclas de espaço, shift e enter.
Instruções detalhadas de utilização:
- Remova o fio estabilizador das caixas de plástico.
- Coloque o fio sobre uma superfície perfeitamente plana (como a tela de um smartphone ou um espelho de vidro). Toque levemente nas duas extremidades do fio com o dedo. Se você ouvir um "clique" ou vir o fio oscilar, ele está dobrado.
- Deslize a ferramenta de nivelamento PAYSON na lateral dobrada do fio.
- Aplique uma leve pressão de torção na direção oposta à da dobra. Faça microajustes.
- Teste o fio novamente na superfície de vidro. Repita o processo até que o fio fique completamente plano e não faça nenhum ruído ao ser tocado.
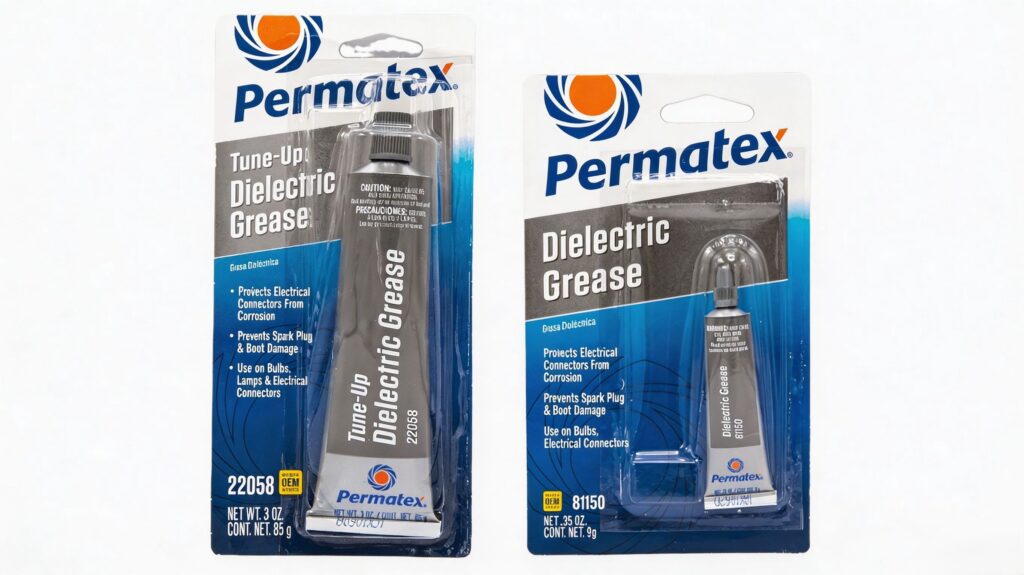
5. Pastilhas estabilizadoras PAYSON e lubrificante Permatex 22058
Apresentação do produto: Essa combinação é a solução definitiva para estabilizadores que fazem barulho. Lubrificante estabilizador de teclado Permatex 22058 É uma graxa dielétrica espessa, padrão da indústria, projetada para amortecer o fio metálico dentro da carcaça de plástico. Enquanto isso, Almofadas de atualização para estabilizador de teclado PAYSON (Adesivos de Teflon/Poron) atuam como amortecedores entre a carcaça do estabilizador e a placa de circuito impresso, suavizando o impacto ao tocar o fundo.
Instruções detalhadas de utilização:
- Limpe bem os estabilizadores para remover qualquer resíduo de lubrificante de fábrica ou poeira.
- Retire as almofadas de atualização do estabilizador PAYSON e cole-as diretamente na placa de circuito impresso (PCB), exatamente onde as hastes do estabilizador farão contato com a placa.
- Mergulhe as extremidades do seu fio estabilizador perfeitamente nivelado no Permatex 22058. Você precisa de uma camada generosa (cerca de 1 cm ao longo do fio) para servir como uma almofada espessa.
- Insira o fio nos alojamentos estabilizadores lubrificados e encaixe-os na placa de circuito impresso.
- Instale a tecla de espaço e dê leves toques em ambos os lados. Se estiver com uma sensação "mole", você aplicou Permatex em excesso. Se estiver chacoalhando, adicione um pouco mais de graxa usando uma seringa ou um pincel fino.
6. Espuma inferior para teclado PAYSON Poron
Apresentação do produto: O espaço vazio dentro da carcaça de um teclado age como um tambor, criando uma ressonância oca e ecoante (som de "case ping"). Espuma para a parte inferior do teclado PAYSON Poron É feito de espuma viscoelástica de alta densidade e grau acústico. Absorve vibrações de alta frequência e aprofunda o perfil sonoro, dando ao seu teclado aquele cobiçado "thock" de alta qualidade.“
Instruções detalhadas de utilização:
- Desmonte completamente o teclado, removendo a placa de circuito impresso (PCB) e o conjunto da placa da parte inferior da carcaça.
- Coloque a espuma PAYSON Poron em uma superfície plana dentro do compartimento vazio.
- Personalização: Use um estilete ou tesoura para aparar a espuma ao redor de quaisquer espaçadores internos, compartimentos de bateria ou recortes de portas USB. A espuma deve ficar plana, sem formar dobras.
- Coloque a placa de circuito impresso de volta no gabinete com cuidado. Certifique-se de que a espuma não esteja exercendo pressão excessiva sobre a placa, o que poderia danificar os soquetes hot-swap.
- Recoloque os parafusos da caixa.

7. Anéis de amortecimento para teclado e espuma para barra de espaço PAYSON
Apresentação do produto: Para quem trabalha em escritórios compartilhados ou faz transmissões ao vivo até tarde da noite, o isolamento acústico é crucial. É essencial. ferramentas para teclas de teclado para ajuste de som, o Anéis de amortecimento para teclado PAYSON reduzir o curso das teclas e suavizar o som áspero do contato plástico com plástico ao pressionar as teclas até o fundo. Além disso, Amortecedor de espuma para barra de espaço de teclado PAYSON É cortada com precisão para preencher a cavidade oca da sua barra de espaço, eliminando instantaneamente o eco alto e estrondoso típico de teclas maiores.
Instruções detalhadas de utilização:
- Anéis de vedação: Remova as teclas. Enrole um anel de silicone na haste transversal sob cada tecla. Empurre-o até o final. Reinstale a tecla.
- Espuma da barra de espaço: Vire a barra de espaço de cabeça para baixo. Limpe a superfície interna para garantir a aderência do adesivo. Retire a película protetora da espuma para barra de espaço PAYSON e pressione-a firmemente nas cavidades vazias entre as hastes transversais. Certifique-se de que ela não roce na carcaça do interruptor ao ser pressionada.
8. Extrator de teclas e switches 2 em 1 da PAYSON
Apresentação do produto: O item definitivo e indispensável para sua coleção de ferramentas para teclas de teclado. Esqueça os puxadores de anel de plástico baratos que arranham suas teclas. Extrator de teclas e interruptores 2 em 1 PAYSON Possui fios de aço inoxidável duráveis para extrair as teclas com segurança e uma pinça de metal resistente na extremidade oposta para segurar e puxar os switches hot-swappable com segurança, sem entortar seus delicados pinos de cobre.
Instruções detalhadas de utilização:
- Removendo as teclas: Deslize os fios metálicos sobre os cantos opostos da tecla. Gire levemente para travar os fios sob a tecla e, em seguida, puxe para cima com um movimento suave de vai e vem.
- Removendo interruptores: Localize as pequenas abas de liberação de plástico nas bordas superior e inferior do interruptor. Aperte essas abas firmemente com a pinça metálica do extrator.
- Após comprimir as abas, puxe o interruptor para cima, na vertical. Nunca force ou puxe em um ângulo., pois isso pode entortar os pinos e potencialmente danificar o soquete hot-swap na sua placa de circuito impresso.
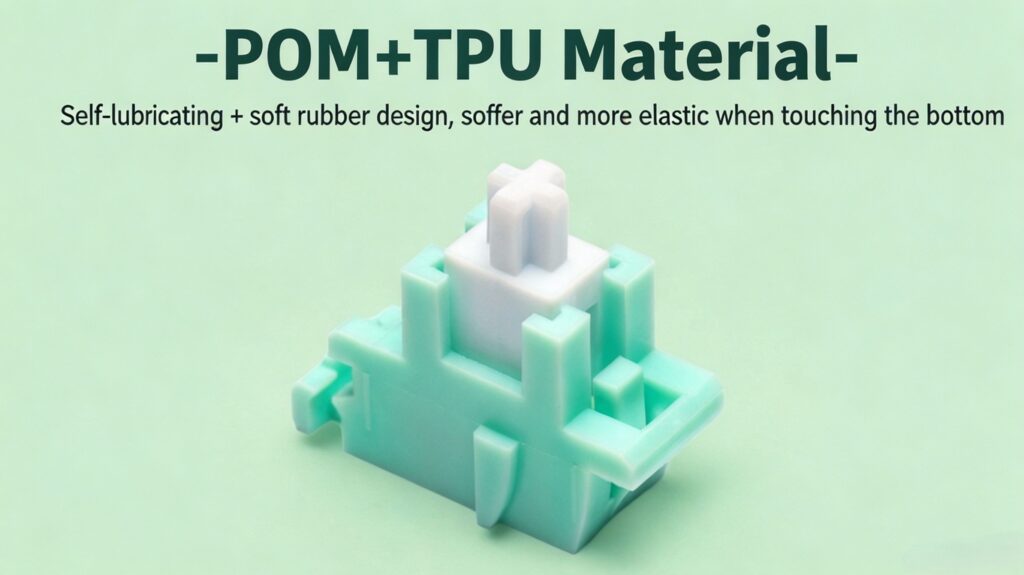
9. Estabilizadores Magnéticos de Jade PAYSON
Apresentação do produto: Experimente o futuro do hardware de teclados. Estabilizadores magnéticos de jade PAYSON Substitua o atrito mecânico tradicional pela tecnologia de levitação magnética. Utilizando repulsão magnética, esses estabilizadores proporcionam uma experiência de digitação incrivelmente suave, sem atrito e completamente silenciosa, que requer praticamente nenhuma manutenção ao longo do tempo.
Instruções detalhadas de utilização:
- Remova os estabilizadores mecânicos originais da placa de circuito impresso.
- Alinhe os estabilizadores magnéticos PAYSON Jade com os furos de montagem da placa de circuito impresso. Fixe-os usando os parafusos ou clipes de encaixe fornecidos (dependendo do tipo da sua placa de circuito impresso).
- Instale a barra de espaço e teste a força de repulsão magnética. A tecla deve retornar à posição inicial suavemente, sem qualquer arranhão de metal contra plástico.
- Como não há atrito físico entre o fio e o plástico, a lubrificação excessiva é totalmente desnecessária. Desfrute de estabilidade silenciosa e duradoura.
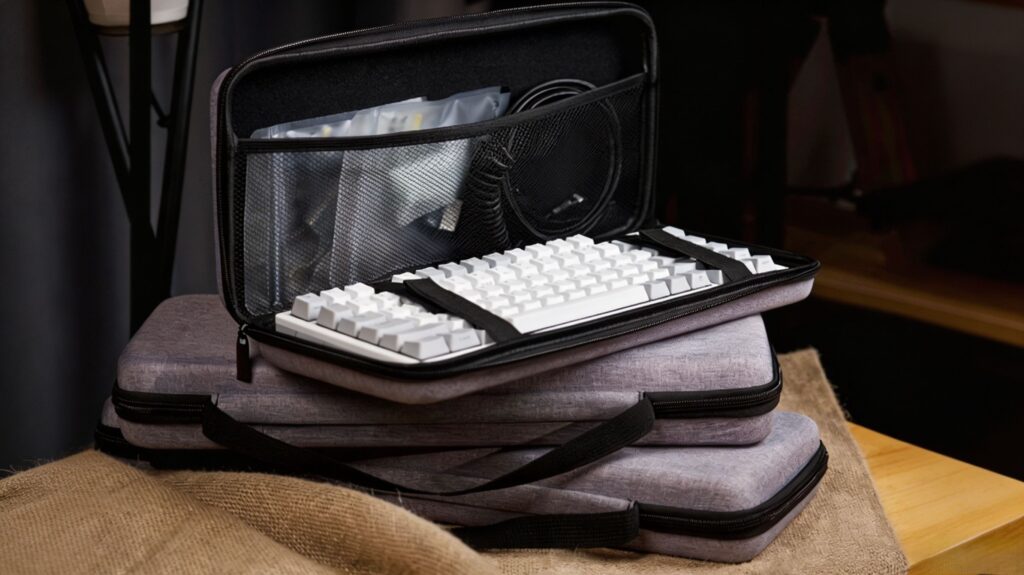
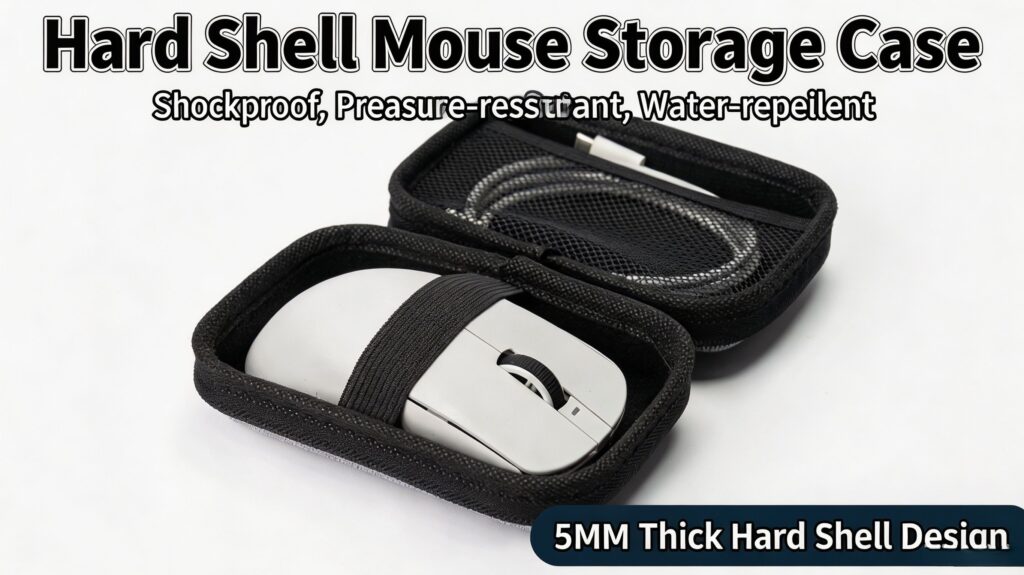
10. Estojo rígido para teclado e estojo para mouse PAYSON
Apresentação do produto: Proteja suas incontáveis horas de personalização com os estojos rígidos PAYSON. Fabricados em material EVA resistente a impactos, com exterior repelente à água e interior aveludado, esses estojos protegem seu teclado e mouse gamer personalizados contra quedas, arranhões, poeira e derramamentos. Estojo rígido para teclado PAYSON e a correspondência Estojo para transporte de mouse PAYSON São a dupla perfeita para deslocamentos diários, viagens ou torneios de esports.
Instruções detalhadas de utilização:
- Desconecte o teclado e enrole o cabo espiralado de forma organizada.
- Coloque o teclado no compartimento moldado sob medida da capa para teclado. Aperte as tiras elásticas internas de velcro para fixar o teclado e evitar que ele se mova.
- Coloque o mouse no estojo de transporte anatômico. Guarde os dongles e cabos sem fio nos bolsos de malha específicos.
- Feche os estojos com o zíper. O exterior resistente pode ser facilmente limpo com um pano úmido caso fique empoeirado.
Dicas diárias de manutenção e longevidade
- Prevenção contra poeira: Use uma escova de cerdas macias ou um spray de ar comprimido semanalmente para remover poeira, cabelos e migalhas de entre as teclas. Isso evita que detritos entrem nos alojamentos dos interruptores e prejudiquem a sensação de digitação.
- Ciclo de relubrificação: Dependendo da intensidade de uso, os lubrificantes dos interruptores e estabilizadores podem ressecar ou migrar com o tempo. Recomendamos uma verificação rápida e uma lubrificação de retoque a cada 6 a 12 meses para manter o som e a sensação perfeitos.
- Armazenamento seguro: Ao modificar seu teclado, guarde todas as peças pequenas (parafusos, molas, hastes) em bandejas magnéticas ou recipientes separados. Sempre guarde seus ferramentas para teclas de teclado e guarde os acessórios de modificação de volta em suas caixas originais para evitar perdas e mantê-los em perfeitas condições para sua próxima montagem.