Building a custom keyboard is the best way to achieve the perfect typing feel, sound, and gaming performance. With our Hall Effect (Magnetic Switch) technology, you aren’t just picking colors—you are customizing the speed and responsiveness of every keystroke.
If you are new to custom keyboards, this guide will walk you through exactly how to customize your board on our product pages and what each option means.
🛠️ Step-by-Step: How to Customize Your Keyboard
On our product page, you will see several dropdown menus. Follow these steps to build your perfect keyboard:
Step 1: Select Your PCB Edition (Standard vs. Pro)
The PCB (Printed Circuit Board) is the brain of your keyboard.
- How to choose: Click the “Edition” or “PCB” dropdown menu.
- What it means:
- Standard Edition: Perfect for everyday gaming and typing, offering excellent magnetic switch performance.
- Pro Edition: Built for hardcore gamers. It features upgraded firmware, higher polling rates for ultra-low latency, and advanced competitive features.
- Note on Compatibility: Both versions are fully compatible with Windows, macOS, and Linux.
Step 2: Choose Your Case Material and Color
The case determines the weight, acoustics, and overall aesthetic of your build.
- How to choose: Select your favorite option from the “Case Color / Material” dropdown.
- What it means:
- CNC Aluminum: Offers a premium, heavy feel and a deeper, more satisfying sound profile (often called “thock”).
- Polycarbonate / Acrylic: Lighter in weight and perfect if you want your RGB underglow lighting to shine through brilliantly.
Step 3: Pick Your Magnetic Switches
Because our keyboards are 100% Hot-Swappable, you don’t need any soldering tools. The switches simply push into the PCB!
- How to choose: Browse the “Switches” dropdown.
- What it means: You can select different types of magnetic switches based on your preference. Look for the “bottom-out force”—lighter switches are ideal for rapid, effortless gaming, while slightly heavier switches provide great feedback for accurate typing.
Step 4: Select Your Keycaps & Layout (Crucial Step!)
Keycaps give your keyboard its personality. It is very important to choose the right layout for your typing habits.
- How to choose: Look at the “Keycaps” and “Layout” dropdown menus.
- What it means:
- ANSI vs. ISO Layout:
- ANSI (US Standard): Features a wide, horizontal Enter key. This is the most common layout globally.
- ISO (European Standard): Features a large, L-shaped Enter key and an extra key next to the left Shift.
- Language Layouts: Depending on your region, you can select specific language sublegends (e.g., English, German, etc.) to match your daily typing needs.
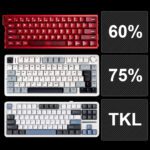
- Keyboard Size Compatibility: Make sure the keycap set you choose supports your keyboard’s form factor (e.g., standard 60% layout, 65% with arrow keys, etc.). Our custom builder will usually only show you keycaps that perfectly fit your chosen board!
- ANSI vs. ISO Layout:
Step 5: Add to Cart and Assemble!
Once you have selected your Edition, Case, Switches, and Keycap Layout, simply add the item to your cart! When your kit arrives, assembling it is a fun and easy process: just snap the switches into the board and press your keycaps on top.
⚙️ Post-Build: Unlock Software Features
The customization doesn’t stop with the hardware. Once your keyboard is built, use our web driver or desktop software to customize its performance:
RGB Lighting: Customize individual key colors and lighting modes to match your setup.
Adjustable Actuation Points: Customize how deep you need to press a key for it to register. Set it to a hair-trigger 0.1mm for gaming, or a deeper 2.0mm for typing.
빠른 트리거: Essential for FPS gamers. This feature resets the key the exact moment you lift your finger, allowing for incredibly fast repeated presses without waiting for the key to travel back up.
Snap Tap: Enable this advanced firmware feature for perfect strafing and counter-strafing in competitive shooters.